文章介绍了使用 gulp 压缩 Hexo 静态资源的方法。通过安装相关插件,配置 gulpfile.js 文件,并执行相应命令,可以对 CSS、JS、HTML 和图片等资源进行压缩处理。最后部署到网站上,提高页面加载速度。
警告
本文最后更新于 2016-07-20,文中内容可能已过时。
前言
前两天把博客托管到 Coding,相比以前放在 Github 访问速度有了不错的提升。
今天休息没事,想着再优化下,查看页面源码发现代码未压缩,于是到 Hexo 插件库看了下,找到个 hexo-all-minifier ,但是我安装下来一直报错,搜索过程中找到基于 gulp 的几个压缩插件,马上试试。
关于 gulp
gulp 的官方定义非常简洁:基于文件流的构建系统。
#说人话系列#:gulp 是前端开发过程中对代码进行构建的工具,是自动化项目的构建利器;她不仅能对网站资源进行优化,而且在开发过程中很多重复的任务能够使用正确的工具自动完成。
安装 gulp 及相关插件
主要安装以下几个:
1
2
| npm install gulp -g
npm install gulp-clean-css gulp-uglify gulp-htmlmin gulp-imagemin gulp-htmlclean gulp --save
|
安装完成后打开 hexo 目录下的 package.json 文件,查看是否安装了上述插件,比如我的:
 1
 2
 3
 4
 5
 6
 7
 8
 9
10
11
12
13
14
15
16
17
18
19
20
21
22
23
24
25
26
| {
"name": "hexo-site",
"version": "0.0.0",
"private": true,
"hexo": {
"version": "3.2.0"
},
"dependencies": {
"gulp": "^3.9.1",
"gulp-clean-css": "^2.0.11",
"gulp-htmlclean": "^2.7.6",
"gulp-htmlmin": "^2.0.0",
"gulp-imagemin": "^3.0.1",
"gulp-uglify": "^1.5.4",
"hexo": "^3.2.0",
"hexo-deployer-git": "^0.1.0",
"hexo-generator-archive": "^0.1.4",
"hexo-generator-category": "^0.1.3",
"hexo-generator-index": "^0.2.0",
"hexo-generator-tag": "^0.2.0",
"hexo-renderer-ejs": "^0.2.0",
"hexo-renderer-marked": "^0.2.10",
"hexo-renderer-stylus": "^0.3.1",
"hexo-server": "^0.2.0"
}
}
|
编写 gulpfile.js
hexo 同级目录下新建文件 gulpfile.js,编辑内容如下,适当修改路径。
比如图片等附件我一直沿用以前使用 WordPress 留下来的 uploads 目录。
其余的插件设置已经在注释中,所有使用说明来自 一点 博客的构建工具分类下文章。
 1
 2
 3
 4
 5
 6
 7
 8
 9
10
11
12
13
14
15
16
17
18
19
20
21
22
23
24
25
26
27
28
29
30
31
32
33
34
35
36
37
38
39
40
41
42
43
44
45
46
47
48
49
50
51
52
53
54
55
56
57
58
59
60
| var gulp = require('gulp');
minifycss = require('gulp-clean-css');
uglify = require('gulp-uglify');
htmlmin = require('gulp-htmlmin');
htmlclean = require('gulp-htmlclean');
imagemin = require('gulp-imagemin');
// 压缩 public 目录内 css
gulp.task('minify-css', function() {
return gulp.src('./public/**/*.css')
.pipe(minifycss({
advanced: true,//类型:Boolean 默认:true [是否开启高级优化(合并选择器等)]
compatibility: 'ie7',//保留ie7及以下兼容写法 类型:String 默认:''or'*' [启用兼容模式; 'ie7':IE7兼容模式,'ie8':IE8兼容模式,'*':IE9+兼容模式]
keepBreaks: true,//类型:Boolean 默认:false [是否保留换行]
keepSpecialComments: '*'
//保留所有特殊前缀 当你用autoprefixer生成的浏览器前缀,如果不加这个参数,有可能将会删除你的部分前缀
}))
.pipe(gulp.dest('./public'));
});
// 压缩 public 目录内 html
gulp.task('minify-html', function() {
return gulp.src('./public/**/*.html')
.pipe(htmlclean())
.pipe(htmlmin({
removeComments: true,//清除 HTML 注释
collapseWhitespace: true,//压缩 HTML
collapseBooleanAttributes: true,//省略布尔属性的值 <input checked="true"/> ==> <input />
removeEmptyAttributes: true,//删除所有空格作属性值 <input id="" /> ==> <input />
removeScriptTypeAttributes: true,//删除 <script> 的 type="text/javascript"
removeStyleLinkTypeAttributes: true,//删除 <style> 和 <link> 的 type="text/css"
minifyJS: true,//压缩页面 JS
minifyCSS: true//压缩页面 CSS
}))
.pipe(gulp.dest('./public'))
});
// 压缩 public/js 目录内 js
gulp.task('minify-js', function() {
return gulp.src('./public/**/*.js')
.pipe(uglify())
.pipe(gulp.dest('./public'));
});
// 压缩 public/uploads 目录内图片
gulp.task('minify-images', function() {
gulp.src('./public/uploads/**/*.*')
.pipe(imagemin({
optimizationLevel: 5, //类型:Number 默认:3 取值范围:0-7(优化等级)
progressive: true, //类型:Boolean 默认:false 无损压缩jpg图片
interlaced: false, //类型:Boolean 默认:false 隔行扫描gif进行渲染
multipass: false, //类型:Boolean 默认:false 多次优化svg直到完全优化
}))
.pipe(gulp.dest('./public/uploads'));
});
// 执行 gulp 命令时执行的任务
gulp.task('default', [
'minify-html','minify-css','minify-js','minify-images'
]);
|
命令执行
1
2
| hexo clean
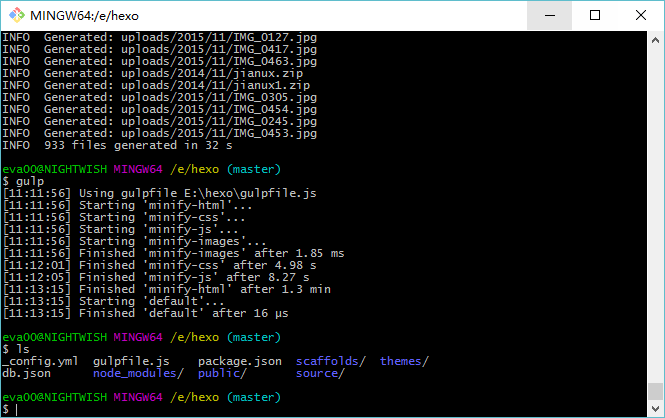
hexo g && gulp
|
 gulp 执行压缩
效果比对
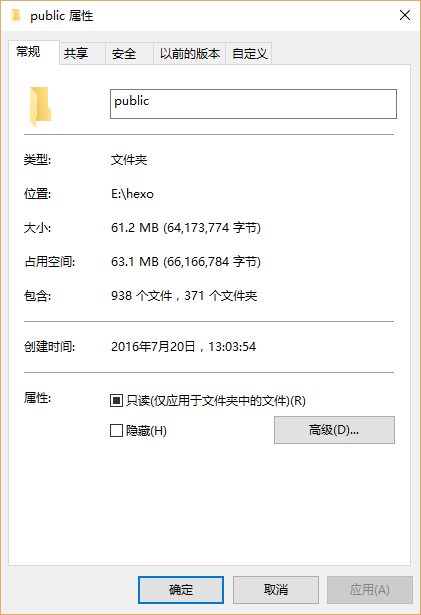
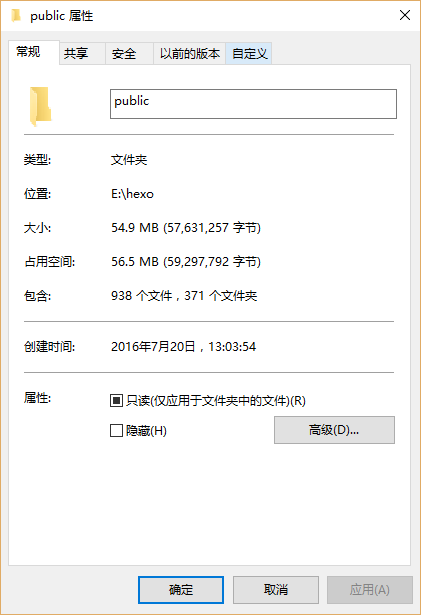
截取了整个 public 目录 压缩前后大小变化图:
 压缩前
压缩前 压缩后
压缩后
貌似压缩得让我不够满意,还是我哪里没弄好。
不管了,先部署上去看看。
以后生成、压缩、部署也可以连起来。
1
| hexo g && gulp && hexo d
|
完成后查看页面源码,整个页面代码都压缩了,实际打开感觉也是比以前快了点。
待更新
先到这里,以后再翻翻资料。


